MOSANI – Complete Instructions
1. General Notes & Information
Before purchasing, please check the application label to ensure that the goods or particular item is suitable for your intended purpose. We cannot be held liable for complaints if the product is installed improperly. Make sure, as far as possible, that the mosaic comes from a single production batch/firing color. Use only products that are suitable for the specific material, purpose, and substrate for laying, grouting, protection, and cleaning. Consult the manufacturers or seek advice from professionals as necessary. Always check the quality, as well as any color variation, dimensional variation, discoloration, or damage before installation. Minor fluctuations are possible due to material and production conditions. Detached tiles/panels can be re-attached to the mesh backing (e.g., mesh) using superglue. Please replace any defective or unsightly goods. Always order with offcut/waste in mind (recommendation: at least 5%). Please note: Natural stone mosaic is a natural product with natural coloration and may have small depressions, inclusions, and veining. Material chipping or unsightly stones are possible and normal. Inspect the tiles both from the front and back, replace any defective elements, and use suitable stones from the offcut to fill gaps (glue dot on the back, place into the empty spot). Read all instructions for the materials being used from the manufacturer before each work step. Always carry out a trial laying – including grouting (if needed) – to test for compatibility of any additional products. Continue installation only if the results are favorable. Any complaints regarding the goods must always be made before installation. Complaints about goods that have already been installed cannot be accepted; resulting costs or installation costs will not be accepted. Recommendation: Store mosaic and construction chemicals for approx. 24 hours prior to installation in the working space to achieve the optimal processing temperature of approx. 20°C.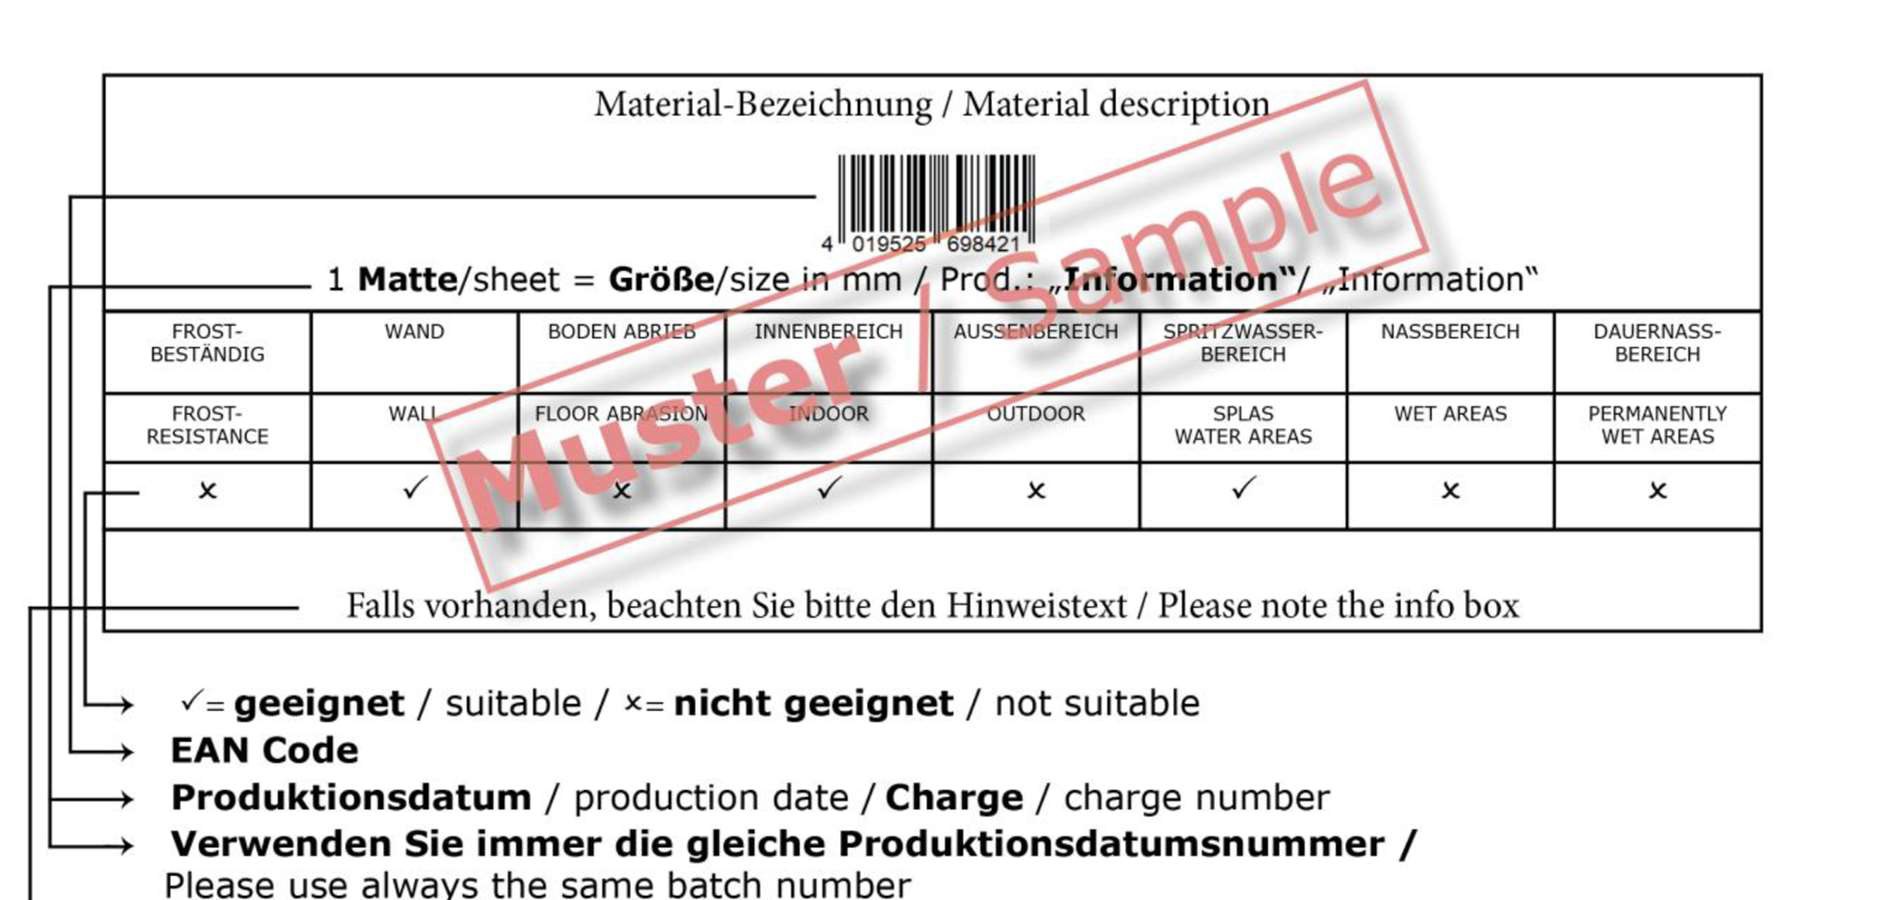
2. Material Properties – Colors, Design, Mosaic Tile Size, Packaging Unit
2.a Representation & Color Variations (Screen/Batch/Photography)
Colors, contrast, and brightness can—regardless of material—vary either slightly or greatly depending on the device (phone/tablet/laptop/monitor). The actual color depends on the batch and the production process. Especially with natural materials (e.g., wood), clear color differences can occur (lighter/yellowish, darker/dark brown, or more reddish). Deviations may be due to production batches, monitor settings, or photography. This applies in particular to natural stone: discolorations (e.g., brown streaks or spots) may or may not be present depending on the batch. Such variations are among the natural properties of the material. Metal components can discolor brown, especially noticeable in light/white natural stones. Images serve solely to illustrate the underlying properties. For strict color matching requirements, we recommend requesting a sample to avoid unnecessary returns.
2.b Base Color & Further Reflections / Color Cast
We usually specify only the base color(s) for each item. Depending on material and light source, other color hues (e.g., purple, green, iridescent) may occur, which cannot be completely specified. Iridescent stones, stone-effect materials, and iridescent tiles often show further reflections which only become apparent upon receipt. Natural stone often shows full color only after impregnation or oiling; perception is subjective. Therefore, we always recommend a sample for initial review.
2.c Sample Picture / Preview for Design & Mixed Goods
Product images serve as preview/sample pictures. Mosaic sheets with designs, images, writing, symbols, or mixed content may differ from how they appear. There are randomly produced products and fixed, defined products—this must be checked before installation. The preview shows typical properties; natural products may be subject to greater variation.
2.d Natural Irregularities & Inspection Requirement Before Installation
Chipping at edges/corners (edge breaks), fine grooves, as well as shape/size/surface irregularities among individual tiles are typical material characteristics and do not constitute defects. It may happen that tiles have come loose, are missing, or have been incorrectly placed. Depending on the tile size, there are around 100 to 1000 mosaic tiles per 1 m²; 100% defect-free delivery is practically impossible. Each sheet must be checked—front and back—before installation for defects, unsightliness, missing or inappropriate tiles, and foreign bodies. Defective tiles are to be removed; lay the sheet and place a suitable tile from the offcut into the free space. We do not open every box for individual checks; transport damage can still occur despite careful packing. These are product characteristics.
2.e Usual Tolerances / Standards / Visual Inspection
Industry norm allows per sheet approx. 1–5% breakage, scratches, or defective tiles. This is not by itself a defect. Even after installation/grouting, cracks may form due to tension, or a damaged tile may have been overlooked—this is a material-specific characteristic. Many mosaics are produced to DIN EN 14411; visual quality control per EN ISO 10545-2. For surface quality, at least 95% of the space per m² must be error-free (max. 5% minor visual defects). Assessment: 300 lux, 1 m distance, viewing angle 90°. Any visually conspicuous elements that may disturb after grouting, or may be disturbing, must be sorted out by the tiler during installation and not installed. Complaints about already installed goods cannot be accepted.
2.f Uniqueness & Tile Pattern / Mesh May Show Through
Every tile is unique; no tile is ever 100% identical. This affects joint lines and spacing—natural variances are normal and intentional. For transparent mosaics, the mesh backing may sometimes be visible from the front, depending on the tile.
2.g Sheet Size / Joint Size / Mesh Relaxation (up to approx. 10%)
Sheet and joint dimensions can vary by batch or installation method. The mesh backing (gauge) may relax in mortar; depending on the gauge, the sheet may stretch by up to approx. 10%. Some sheets contract at first and then relax in the adhesive.
2.h Size Indications as Approximate Values / Dimension Tolerances
Size indications for tiles, mosaics, and sheets are always approximate. Variations can occur by batch and tool, especially with hand-made natural stone products (e.g., natural pebbles). Deviations of up to 1–2% in tile/sheet/mesh size are possible. Example: Sheet 305×305 mm can vary by 1–2%. For mosaic tiles, variation in width/height/thickness up to around 2% is possible (e.g., 25×25 mm ≈ 24.5–25.5 mm; thickness 6 mm ≈ 5.5–6.5 mm). Mesh sizes vary by batch/supplier/manufacturer (e.g., 300×300, 305×305, 322×322, 327×327 mm, etc.).
2.i Length Specification (Length × Width) for Area Calculation
Length × width is specified for area calculation. For Roman bond or modular mosaics, actual length/height may differ (e.g., sticks may overlap the rated dimension or interlock). The specification is for simplified area calculation.
2.j Reorders / Batch Consistency / Inspection Requirement Under DIN
For separate orders/reorders, different batches may be delivered. Tone, texture, and dimension deviations are permitted within manufacturer tolerance as well as per DIN EN 14411 (e.g., for different production runs, tool changes, material batches). There can never be a 100% guarantee of visual uniformity for all elements as per the standards.
According to DIN 18157 and industry-accepted tiling practices, the installer is obliged to check the material as follows:
- Visual inspection of every sheet for color, texture, dimensional accuracy, and deviations
- Dry-lay over a large area before starting to evaluate the overall look
- For front paper-faced products, check by comparing backsides (front is fully visible once the paper is removed)
- Ensure a harmonious overall look before adhesive is applied / sheets are fixed
Tiles with obvious variation may not be installed without consulting the supplier. If color differences are processed despite a dry test, responsibility falls to the installer. Recommendation: Order as much as possible at once, including generous extra quantity, so all sheets come from the same batch and trial installations work as intended.
2.k Mixes / Special Mixes
Mix ratios are estimated by percentage and refer to the total area of approx. 1 m². Special mixes are produced at random.
2.l Support Types / Backings
Products consist, in most cases, of mosaic tiles mounted either on sheets of paper or with a mesh backing. Depending on the product, mesh backing, PUR adhesive, or dot-joint methods may also be used.
3. Substrate & Cutting
The substrate must be firm, smooth, level, supporting, dry, and dust-free. Always fill out unevenness. Prepare white substrates with white flexible adhesive and sand after approx. 12 hours using a sanding stone (vacuum sanding dust). Roughen smooth or extremely dense surfaces. Prime cement-based/mineral substrates (screed, render, plasterboard) in advance. For rigid foam substrates, this is generally not required. Use only tools suited to the material for cutting. Tip: Reduce need for cutting by planning (risk of breakage). Make marks only with non-permanent pens.
3.1 Cutting by Material
- Aluminum / Stainless Steel / Copper: Wet saw or metal saw; smooth the cut with sandpaper/metal file; do not mount strongly adhesive items on the surface if they will need to be removed.
- Glass Mosaic: For single tiles: mosaic nippers; for whole sheets: angle grinder with diamond blade or wet saw with diamond cutting disc; pre-mark cutting lines; make several passes; smooth edges.
- Artificial / Natural Stone / Natural Stone Combination: Wet saw or angle grinder with a diamond cutting wheel/disc for stone.
4. Laying
Choose a suitable starting point and account for the dimensions of the tile/sheet and desired appearance. Always start with full sheets and finish with partial pieces as needed. Take mosaic thickness/sheet shape into account when combining with other materials. Lay out sheets dry in advance. Mind the spacing between sheets; the joint width between tiles must align at sheet edges. Tip: Draw guide lines on the area.
Mix adhesive/mortar to a non-runny consistency (to prevent slippage). Only apply to small areas at a time (trowel: rectangular teeth 2.5 mm wide / 3.5 mm deep or square teeth 4×4 mm, or 6×6 mm for exterior / permanently wet zones). Then smooth to ensure an even, void-free installation and avoid show-through. Keep the surface clean during installation and remove any excess adhesive from the joint pockets. Use white adhesive/mortar only (to prevent show-through), suitable to material, application, and substrate.
4.1 Adhesive Recommendation by Material
- Glass / Aluminum / Stainless Steel / Copper: White, polymer-modified, hydraulically fast-hardening adhesive for non-absorbent materials (epoxy adhesive and grout); keep lines straight.
- Artificial / Ceramic / Natural Stone / Natural Stone Combination: White, natural-stone-suitable, polymer-modified, hydraulically fast-hardening epoxy adhesive and grout for absorbent materials.
- Mosaics with colored foils, as well as gold, silver, and metal finish or as decor, must be installed exclusively with epoxy adhesive and grout. Cement-based adhesives may react and damage the foil.
- Always carry out a test bonding and grouting
4.2 Permanently Wet Areas
In permanently wet zones, use only chemical-resistant reaction resin adhesive or 2-component epoxy adhesive. Also, consult the manufacturer (material approvals/alternatives). For pool glass mosaics, front paper-faced products are ideal. Let adhesive dry for approx. 24 hours before grouting.
5. Grouting
Grout in small areas with a suitable grout. Joint flanks and substrate must be dry and free from substances that might impair adhesion. Scrape off adhesive residues evenly. Joints must not be wet during grouting. Apply grout with a rubber squeegee or float. Remove excess with a sponge board or hand sponge. Clean promptly with a dry cloth. Let grout dry for a day before cleaning thoroughly. Note: Some mosaics have indentations (design/material). Grout may remain trapped and cause streaking/effects. Reduce by cleaning promptly and by using a grout color similar to the tile; high contrast increases the streaking effect.
5.1 Grouting by Material
- Aluminum / Stainless Steel / Copper: After adhesive has dried, use polymer-modified grout for non-absorbent surfaces; grout with quartz sand may cause scratches if incorrect tools are used; unsuitable contents may attack surfaces; do not mount strongly adhesive items intended for later removal.
- Glass Mosaic: After adhesive has dried, use polymer-modified grout for non-absorbent surfaces; quartz sand can cause scratching; make sure to fill joint pockets completely (prevents light refracting).
- Artificial / Ceramic / Natural Stone / Natural Stone Combination: After adhesive has dried, use natural-stone-suitable, polymer-modified grout for absorbent surfaces.
5.2 Permanently Wet Areas
In permanently wet areas, use only chemical-resistant reaction resin grout (epoxy adhesive).
6. Protective Instructions
6.1 Natural Stone and Natural Stone Combination Mosaic
After installation and before grouting, treat natural stone mosaics with a suitable stain guard for natural stone. For a richer surface color, apply a color intensifier that is suitable for natural stone after grouting.
6.2 Unglazed Ceramic Mosaic
For unglazed ceramic mosaic, apply stain protection if you wish to protect the surface. Please consult your construction chemical suppliers; using the wrong product can cause staining.
7. Cleaning
Clean with warm water and a cloth. Do not use waxes, oils, or acids. Never use abrasive cleaners, scouring pads, or cleaners with strong chemical additives; these may damage or scratch the surface.
- Aluminum / Stainless Steel / Copper: Soft sponge, warm soapy water or alcohol; do not use acidic or alkaline abrasive cleaners.
- Artificial / Glass: Use commercially available, non-alkaline glass cleaner without any abrasive components.
- Natural Stone / Natural Stone Combination: Fat-free, non-alkaline natural stone cleaner (ideally from the manufacturer of the impregnation/color enhancer). Impregnation does not protect against acid. Do not use acidic “gray haze removers” and avoid both alkaline and acidic/corrosive cleaners. For combination mosaics, also follow advice for the other materials used.
8. Self-Adhesive Products (DIY) – Ready-to-Use Products on Self-Adhesive Backing
Important: Do not store materials outdoors or in high humidity. Not suitable for use in wet or permanently wet areas. Do not use inside showers or any location exposed to permanent water (e.g., pools). Avoid areas exposed to extreme heat (e.g., fireplaces, gas stoves, open flame).
The surface must be very clean, dry, and dust-free. Do not apply to porous/rough, latex-, vinyl-, or PVA-containing surfaces or wallpaper. After installation, mats are difficult to remove—therefore, each mat must be aligned precisely. If incorrectly placed, remove immediately; removed materials cannot be reused and must be replaced.
Suitable only for interior wall surfaces. Test first on the surface if possible. Suitable substrates: painted walls (allow time to dry), smooth tiles, plasterboard, MDF panels. All surfaces must be dry, smooth, clean, and free from grease/dust/dirt. The substrate must be able to bear the weight.
8.1 Step-by-Step Assembly (DIY)
- Clean: Clean the area thoroughly; remove all residue (adhesive, grease, dirt) completely; let dry well.
- Temperature: Allow surface to reach room temperature (approx. 20°C).
- Starting Point: The first mat must be positioned perfectly straight; establish a starting location; take your time with this step.
- Pre-position: Place the mat in position before removing the backing paper; use level and pencil to draw lines or contours as a guide.
- Cut: Use a suitable tool.
- Peel: Line up the top edge with your line; gently and slowly peel off the backing paper.
- Stick: Apply the mat stepwise; press with gentle pressure (e.g., sponge trowel), until backing is completely removed.
- Seal: Seal any gaps between wall and mat with silicone.
9. Repair / Replacement of Defective Tiles & Offcuts
9.1 Offcut Recommendation
Please always calculate for and order 5–10% offcut (depending on your installation technique). Reasons: edge/corner cuts, replacements due to defects, or possible future lack of batch consistency when replacing tiles.
Shipments rarely arrive 100% without any defects. With hundreds or thousands of tiles/sheets/panels, it is rare for every single part to be perfect; transport damage can also occur. Small defects are usually fixable with offcuts, so work is not interrupted or delayed waiting for replacements.
9.2 Replacing Defective Tiles Before and During Installation
- Inspect sheets/tiles/panels from both front and back.
- Remove damaged or missing parts.
- Install sheet/tile/panel as instructed.
- If there are no matching offcuts or the damage is too extensive: send a photo as proof (for validation or replacement). Alternatively, take a tile from the offcut, add glue to the back, and fit it into the empty space.
- After installing and grouting, inspect again and replace any additional broken elements.
Note: A percentage of approx. 5% defective tiles/sheets/borders/panels is considered normal and is not considered a defect. We are usually flexible; offcuts prevent downtime. Defective parts should be used primarily for corners/edges/offcuts, and, as a rule, not thrown away.
9.3 If No Offcut Was Planned
If you did not plan for offcut material and cannot continue your work as a result, please let us know. We will generally send a free replacement for swap (after review).
10. Abbreviations & Notes
- AEM = Aluminum / Stainless Steel / Copper Mosaic
- ASM = Artificial Mosaic
- GM = Glass Mosaic
- KM = Ceramic Mosaic
- KMU = Ceramic Mosaic Unglazed
- NM = Natural Stone Mosaic
Note: Subject to change, misprints, and errors.